Practise the program planner
Twenty-four short exercises on a practice plan for a made-up product, a smart thermostat. The first twelve cover the basics: import a plan, record progress, set a baseline, change the calendar, add and protect rows, re-import and export. The rest run the plan the way a program does: the board, link types, owners and My plan items, resources and levelling, cost and earned value, Excel and Microsoft Project files, evidence, and the Creopus agent. Nothing you do here touches your own systems.
Every date in the practice plan is in 2025. Whenever you do these exercises, the whole plan is in the past, so every figure below is exact. That is also the real first day with your own plan: an existing schedule, brought up to date. The one exception is exercise 23, where evidence finishes a row on the day you do it.
You need:
- a Creopus account;
- the practice plan: smart-thermostat-practice-plan.xlsx. It is fictional and made for this tutorial;
- for exercise 21, the same plan as a Microsoft Project file: smart-thermostat-practice-plan.xml;
- for exercise 20, Excel or any spreadsheet that saves .xlsx.
How each exercise is written. Numbered steps, each naming the control to use and quoting what it puts on the screen, then What you should see: every figure to check, including the ones that stay the same. Background comes after the checklist.
Do the exercises in order: each one starts where the one before it left the plan. If a figure on your screen differs, check that you are on your practice system: the line under Program plan names the system.
Starting over. Fork the practice template again, as in exercise 1, for a clean copy. Every copy has the same name; system pickers tell them apart by when each was made ("Smart Thermostat (planner practice) · made 22 Oct 2026, 13:38"). Or keep the system: use Remove imported sheet on Master Plan and then on Program, and import the workbook again. That keeps the calendar, the currency, the resources and the baselines, and the header names the import as the baseline again. Rows you added in Creopus (C-1, C-2) stay until you delete them from their editor.
The basics
Exercise 1: Fork the practice system
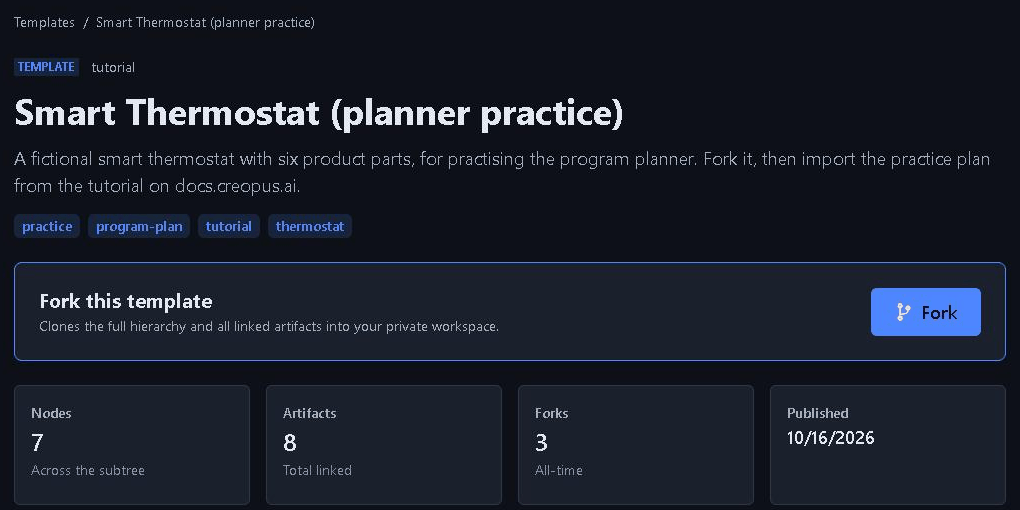
- Open the practice template: Smart Thermostat (planner practice).
- Click Fork. A box asks "Fork this template?". Click Yes, fork it.
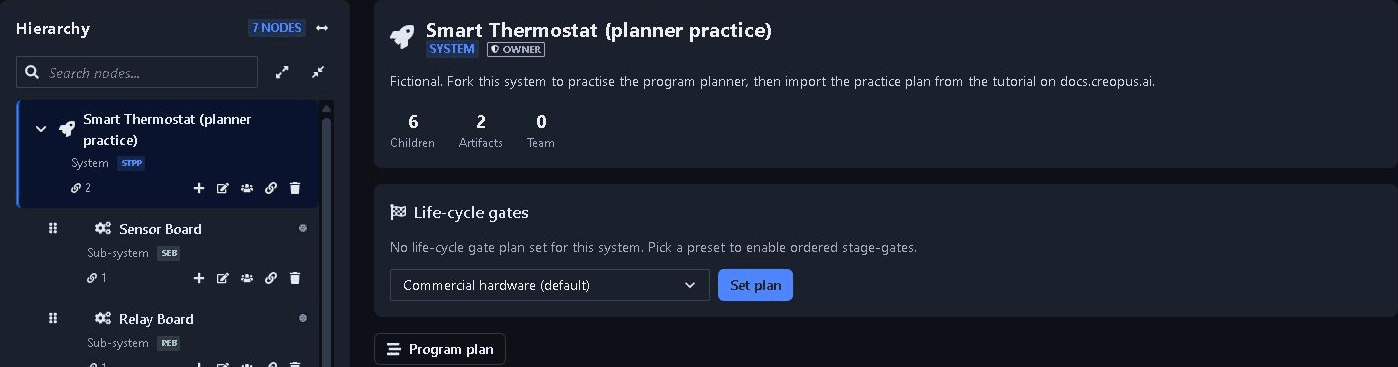
- On the page you land on, click Program plan, under the system's Life-cycle gates box.
What you should see
- The page you land on: your own copy of the system, with six product parts: Sensor Board, Relay Board, Display Module, Wi-Fi Module, Enclosure and Mobile App. Each part comes with a draft requirements document, which exercise 23 comes back to.
- The system selector: "Smart Thermostat (planner practice)". When you have more than one copy, each is listed with when it was made, such as "Smart Thermostat (planner practice) · made 22 Oct 2026, 13:38".
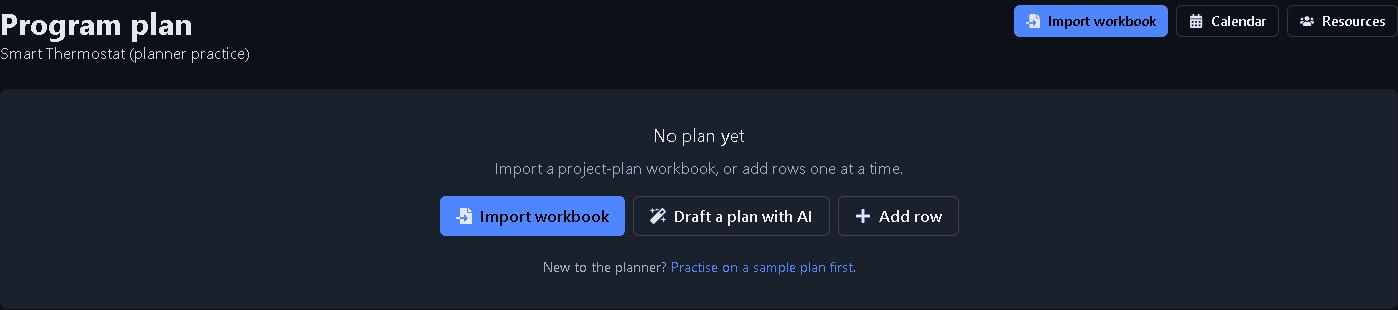
- The program plan: "No plan yet", with Import workbook, Draft a plan with AI and Add row.
Exercise 2: Import the practice plan
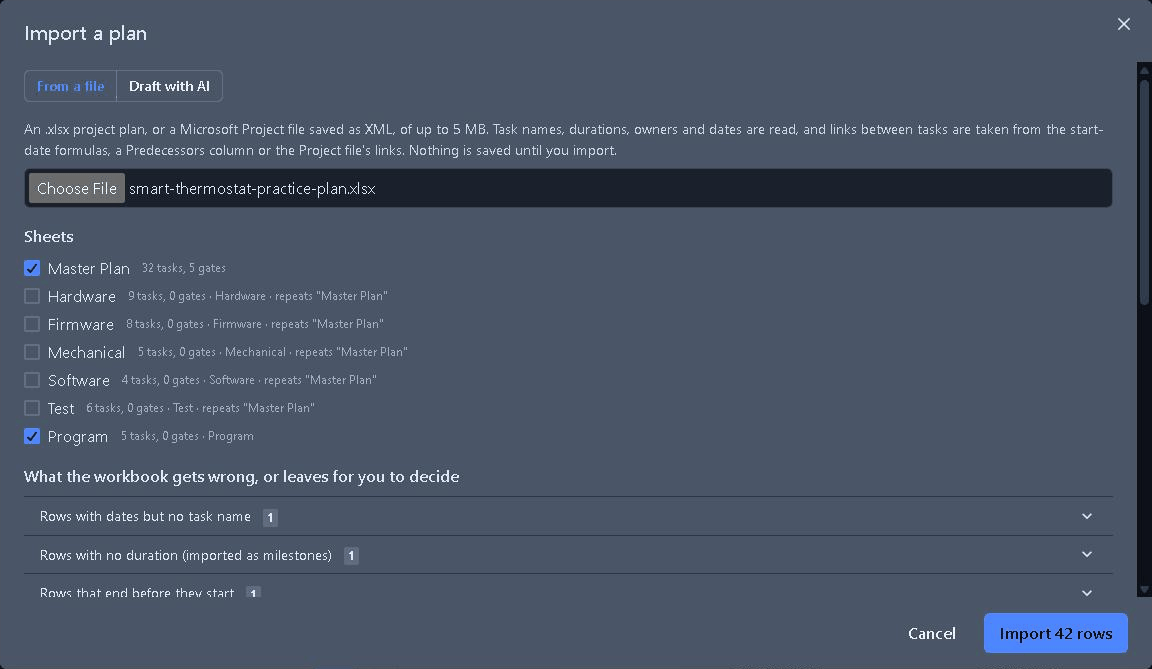
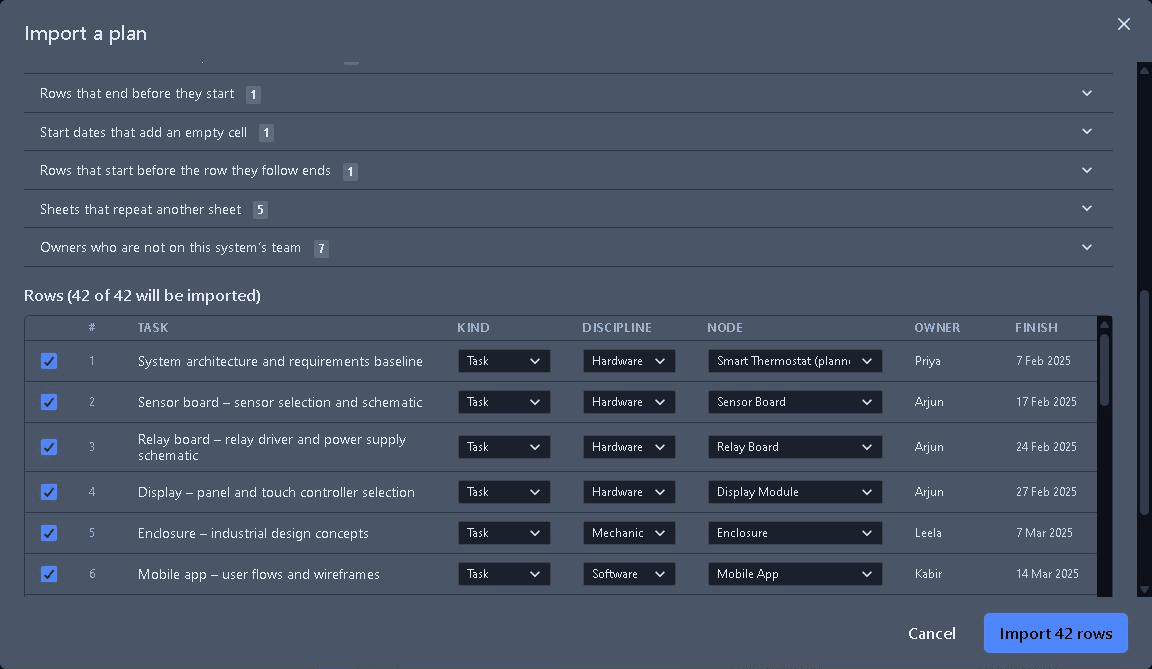
- Click Import workbook, then Choose File, and pick the practice plan you downloaded. The box says "Nothing is saved until you import."
- Read the preview before you import (below).
- Click Import 42 rows.
What you should see
- Sheets: Master Plan ("32 tasks, 5 gates") and Program ("5 tasks, 0 gates") are ticked. Hardware (9 tasks), Firmware (8), Mechanical (5), Software (4) and Test (6) are unticked, each marked as repeating "Master Plan": they are each team's view of the master. Their rows are not imported twice, but their tab names give those rows a discipline.
- "What the workbook gets wrong, or leaves for you to decide": 17 notes in seven groups, one of each common mistake:
- Rows with dates but no task name: 1. A leftover row at the end. It is skipped.
- Rows with no duration (imported as milestones): 1 and Rows that end before they start: 1. Both are the EVT sign-off, row 15, whose Days cell is empty. It comes in as a milestone.
- Start dates that add an empty cell: 1 and Rows that start before the row they follow ends: 1. Row 23's start date adds an empty cell instead of a working day, so in the workbook it starts on the day row 22 ends. The plan makes it wait, which puts everything after it one working day later than the workbook. You will see that as "+1".
- Sheets that repeat another sheet: 5. The team tabs.
- Owners who are not on this system's team: 7. The names stay as text on their rows.
- Rows: "Rows (42 of 42 will be imported)", each with its kind, discipline, node and owner, which you could change here. Leave them.
- The message, once imported: "Plan imported" and "42 rows added, 0 updated. Link rows to their evidence from Suggested evidence."
Exercise 3: Find your way around
Nothing to click yet: look over the page.
What you should see
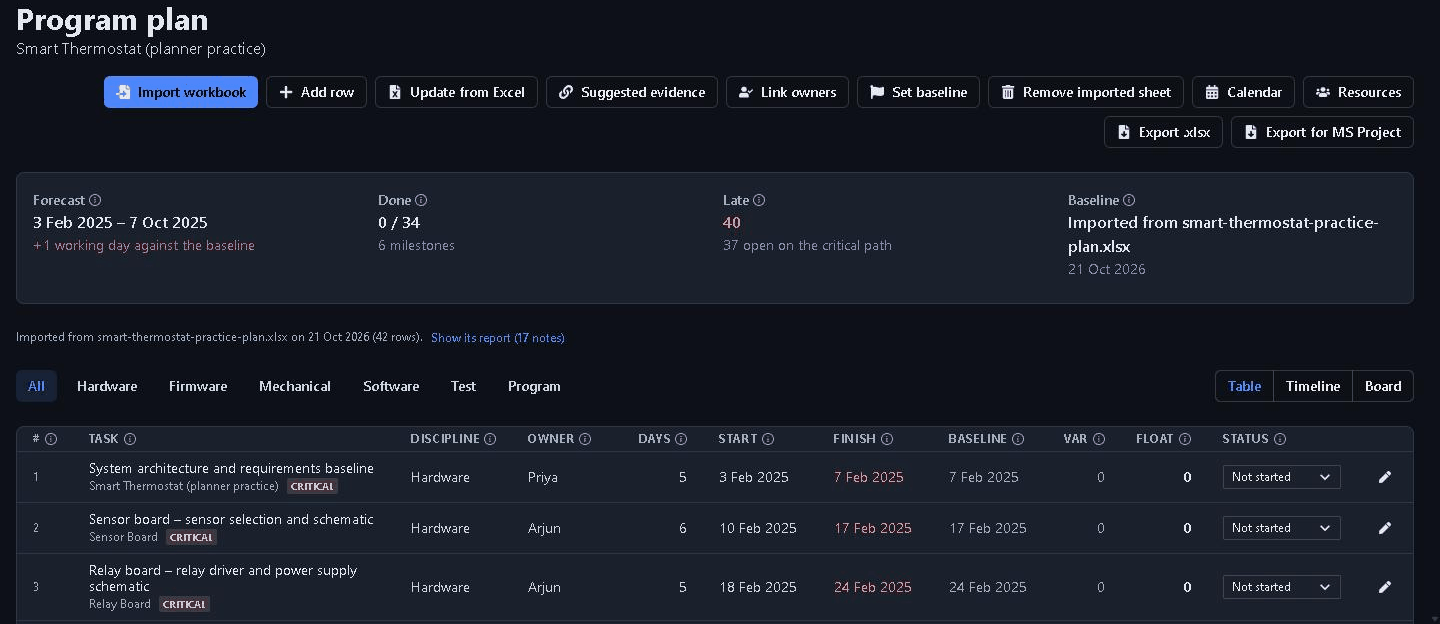
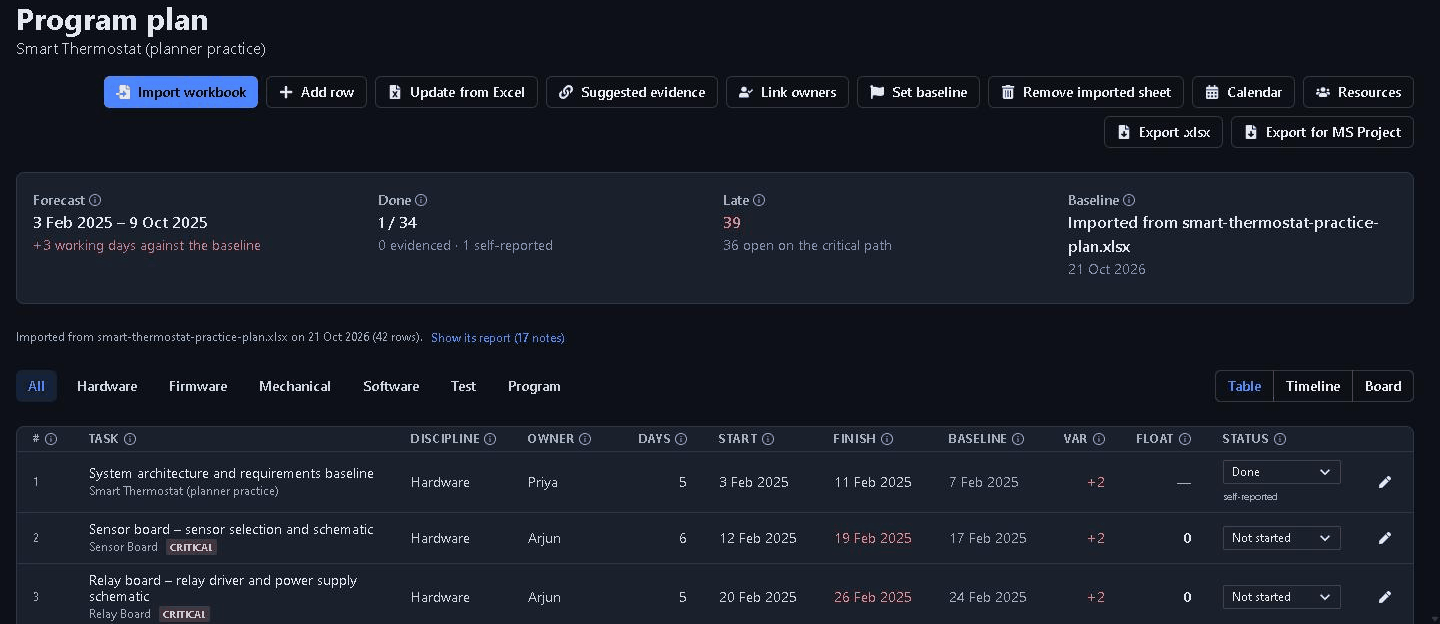
- Forecast: "3 Feb 2025 – 7 Oct 2025", with "+1 working day against the baseline". That is row 23's slip.
- Done: "0 / 34", with "6 milestones" counted apart.
- Late: 40, with "37 open on the critical path". Every row due before today counts as late until it is recorded as done, and nothing in the workbook is.
- Baseline: "Imported from smart-thermostat-practice-plan.xlsx", with today's date. The workbook's own dates are what the plan is measured against.
- Under the figures: "Imported from smart-thermostat-practice-plan.xlsx on 22 Oct 2026 (42 rows).", with your own date, and Show its report (17 notes), which keeps the report on the page.
- The # column: the workbook's own IDs, 1 to 32, with G0 to G4 for the stage gates and P-1 to P-5 for the Program tab's rows.
- The tabs: All, Hardware, Firmware, Mechanical, Software, Test and Program. A tab shows its discipline's rows plus the five stage gates, which every discipline shares: Hardware shows 14 rows.
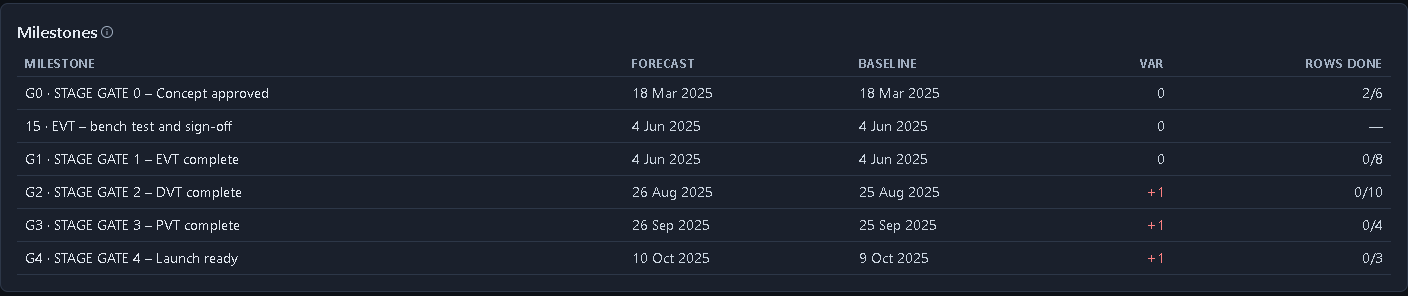
- Milestones, at the bottom: G0 · STAGE GATE 0 on 14 Mar 2025 and G1 on 2 Jun 2025, both on their baseline (0); G2 on 21 Aug, G3 on 23 Sep and G4 on 7 Oct 2025, each +1.
- Schedule health: BEI (rows finished ÷ rows due) "0.00 (0/34)". Two checks are over their limits:
- Rows missing a predecessor or a successor: 3. P-3, P-4 and P-5, the Program tab's rows, whose dates are typed in rather than linked.
- Rows not finished by their baseline finish: 40.
Every column heading and every field of the row editor has an ⓘ. Hover it, tap it or tab to it to read what it means. Schedule health runs checks taken from the US Defense Contract Management Agency's 14-point schedule assessment: "Advisory checks after the DCMA 14-point assessment. They never block a change."
Exercise 4: The timeline
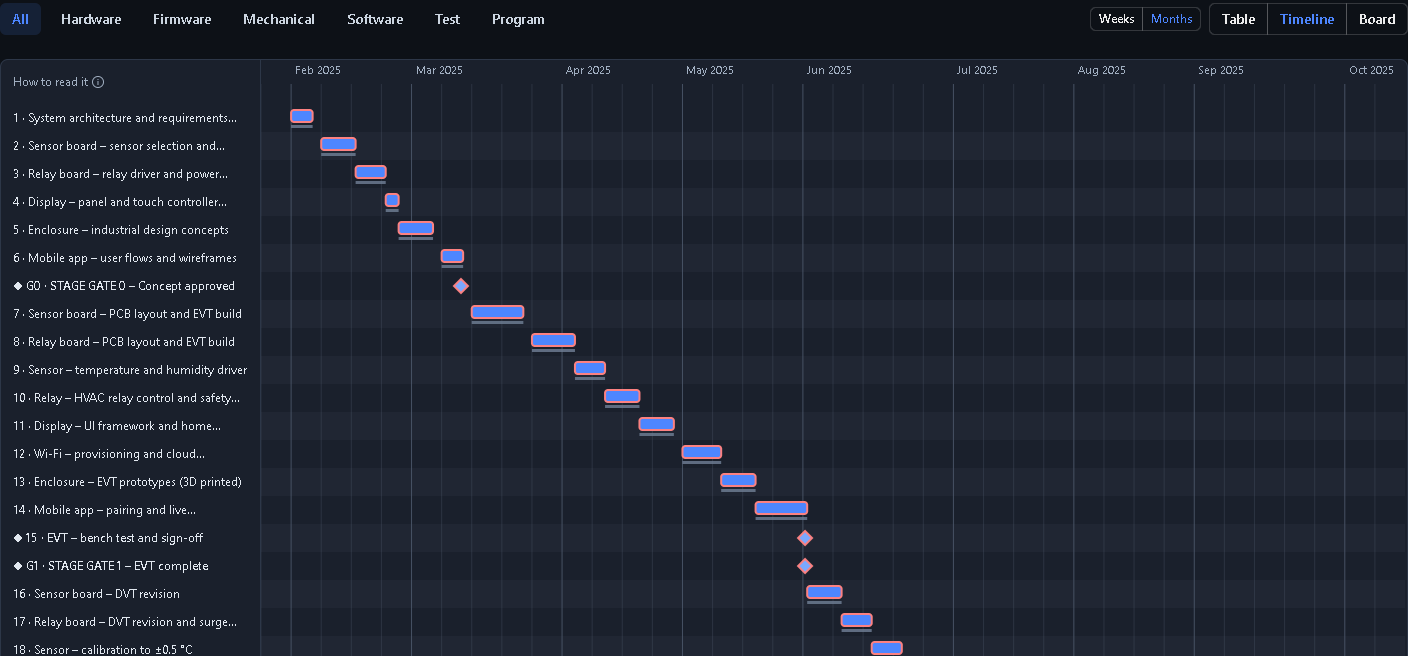
- Click Timeline, at the right above the table, then Months to see the whole plan, or Weeks for detail.
- Hold the mouse over a bar to see its dates, baseline and float. Click one to open its editor, then close it.
- Go back to Table.
What you should see
- Row labels: each row's ID and title, such as "1 · System architecture and requirements baseline" and "◆ G0 · STAGE GATE 0 – Concept approved".
- Bars: blue is not started, light blue is in progress and green is done. A red outline: on the critical path. ◆: a milestone. A thin grey line under a bar: its baseline.
- Faded grey bars: level of effort, P-1 and P-2, the two program-management rows. They run 3 Feb – 6 Oct 2025, the dates the workbook gave them, while the plan now ends 7 Oct: a level of effort keeps its own dates and does not follow the schedule's slips.
Exercise 5: Record a late finish
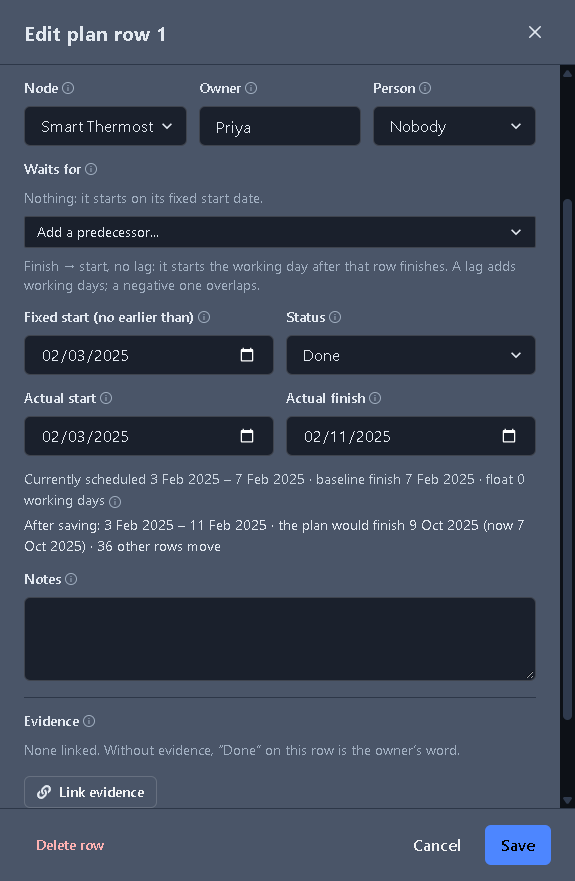
Row 1, "System architecture and requirements baseline", was planned for 3–7 Feb 2025. Say it finished on Tuesday 11 Feb, two working days late.
- Click the pencil at the end of row 1, or the row's title. Its editor opens at the left, beside the plan, headed "Edit plan row 1", and row 1 is highlighted in the table. Under the dates it reads "Currently scheduled 3 Feb 2025 – 7 Feb 2025 · baseline finish 7 Feb 2025 · float 0 working days".
- Set Status to Done, Actual start to 3 Feb 2025 and Actual finish to 11 Feb 2025. Before you save, a line appears under the dates: "After saving: 3 Feb 2025 – 11 Feb 2025 · the plan would finish 9 Oct 2025 (now 7 Oct 2025) · 36 other rows move".
- Click Save.
What you should see
- Row 1: finishes 11 Feb, with Var +2, and reads self-reported under its status.
- Every row after it: two working days later. Row 2 now runs 12–19 Feb.
- Forecast: 3 Feb 2025 – 9 Oct 2025, with "+3 working days against the baseline": the workbook's +1 plus this +2.
- Done: 1 / 34, "0 evidenced · 1 self-reported". Late: 39, with "36 open on the critical path". BEI: 0.03.
The two working days lost are Monday 10 and Tuesday 11 February; the weekend before them does not count. The "After saving" line is the planner's own answer, worked out on a copy of the plan with your change: nothing is saved until Save, and the editor never covers the table, so you can read the row against its neighbours while you edit. Drag the editor's right edge to give it, or the plan, more room. Further down the editor, Evidence reads "None linked. Without evidence, “Done” on this row is the owner’s word." Exercise 23 comes back to that.
Exercise 6: Record progress straight from the table
The Status dropdown in the table records progress without the editor.
- On row 2, set Status to In progress. The message reads "Recorded as started on 12 Feb 2025".
- On row 3, set Status to Done. The message reads "Recorded as finished on 26 Feb 2025" and "Its planned finish. If it finished on another day, set the actual finish in the row’s editor."
What you should see
- Done: 2 / 34, "0 evidenced · 2 self-reported". Late: 38, with "35 open on the critical path". BEI: 0.06.
- Forecast: unchanged, 9 Oct 2025 and "+3 working days": both rows kept their planned dates.
The rule: Done or In progress without dates records the planned dates when they have passed, otherwise today. Microsoft Project does the same for a task marked 100% complete. When work happened on other days, use the editor, as in exercise 5. Choosing Not started again clears the dates it recorded.
Exercise 7: Set a new baseline
Suppose the team agrees, after a review, that the new dates are the plan from now on.
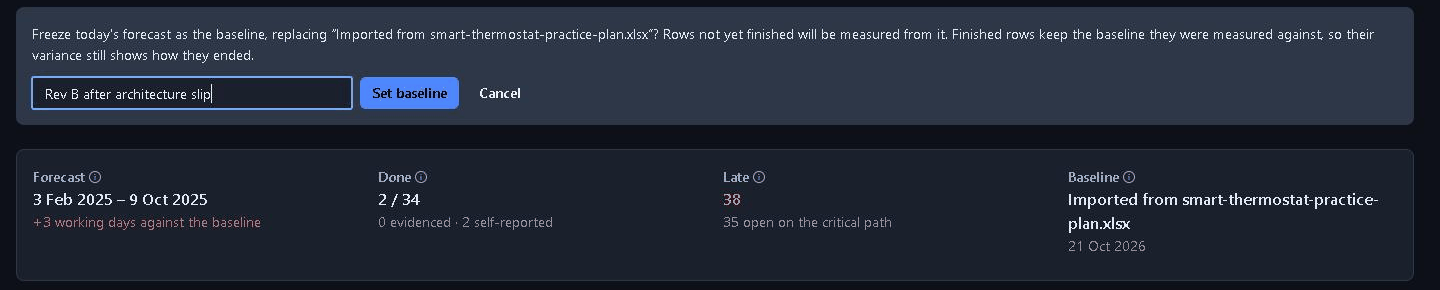
- Click Set baseline. A box asks "Freeze today's forecast as the baseline, replacing “Imported from smart-thermostat-practice-plan.xlsx”? Rows not yet finished will be measured from it. Finished rows keep the baseline they were measured against, so their variance still shows how they ended."
- Type the label Rev B after architecture slip, then click Set baseline in the box. The message reads "Baseline set" and "Rows not yet finished are now measured from today’s forecast; finished rows keep theirs."
What you should see
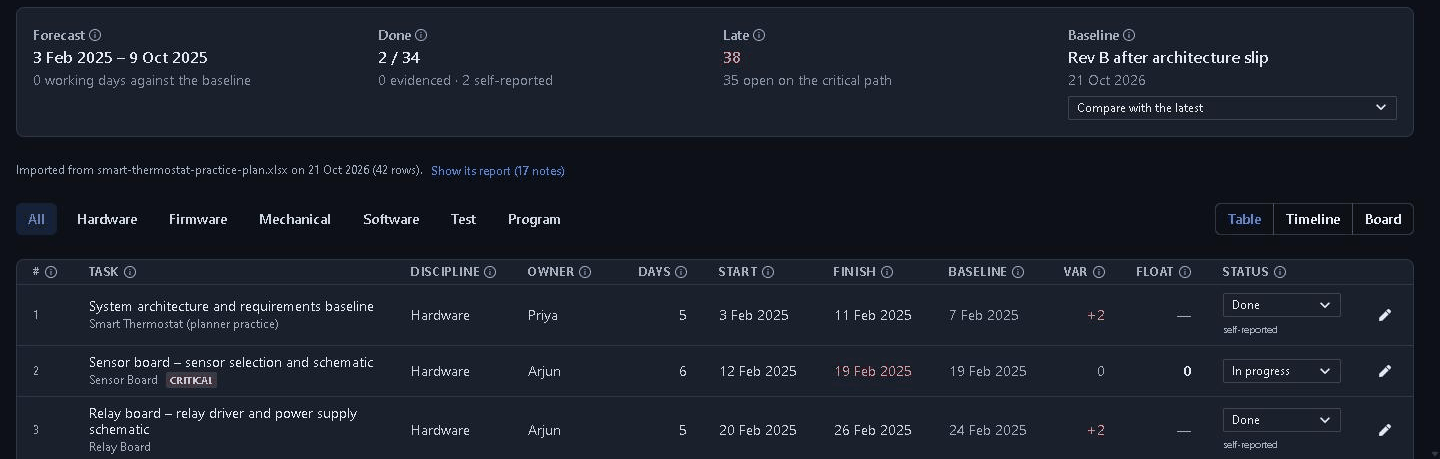
- Forecast: "0 working days against the baseline". Baseline: "Rev B after architecture slip".
- Var: 0 on every row not yet finished.
- Rows 1 and 3: still +2. A finished row keeps the baseline it was measured against, so its record of how it ended stays. In earned-value practice (ANSI/EIA-748), work already done is not re-planned after the fact.
- Under the baseline: a Compare with the latest list, holding the import's baseline. The plan keeps every baseline you set; exercise 19 uses it.
- Rows not finished by their baseline finish: still 40. The new baseline's dates are in 2025 too.
A baseline is a decision, not a refresh. Change it under change control, and use the label to say why.
Exercise 8: Add a holiday
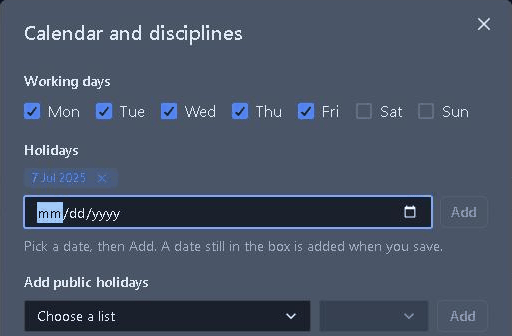
- Click Calendar. The box is headed "Calendar and disciplines".
- Under Holidays, pick 7 Jul 2025 and click Add. A tag reading "7 Jul 2025" appears. A date still in the box when you save is added too, and a half-typed one is refused.
- Click Save.
What you should see
- Forecast: 3 Feb 2025 – 10 Oct 2025, with "+1 working day against the baseline".
- Row 20, "Display – schedules and setpoint screens": the first master-plan row to move. It runs across 7 Jul, so it now finishes 11 Jul instead of 10 Jul, and every row after it moves one working day.
- The Program tab's rows across 7 Jul: they take the day too, though nothing links them. P-1 and P-2 now end 7 Oct instead of 6 Oct, and P-3, "Certification planning (FCC, CE, UL)", 1 Sep instead of 29 Aug. P-4 and P-5 start after the holiday and keep their dates.
- Milestones: G2, G3 and G4 read +1 (26 Aug, 26 Sep and 10 Oct 2025). G0 and G1, which come before July, read 0.
- Done and Late: unchanged at 2 / 34 and 38.
You re-baselined in exercise 7, so this +1 is the holiday and nothing else. One calendar serves the whole plan: put your own holidays here, and tick Sat if your team works Saturdays. Add public holidays adds a country's official list for a year in one step (India, the United States, the United Kingdom and Japan). The same box sets the plan's time zone and, in exercise 16, its currency.
Exercise 9: Add a row
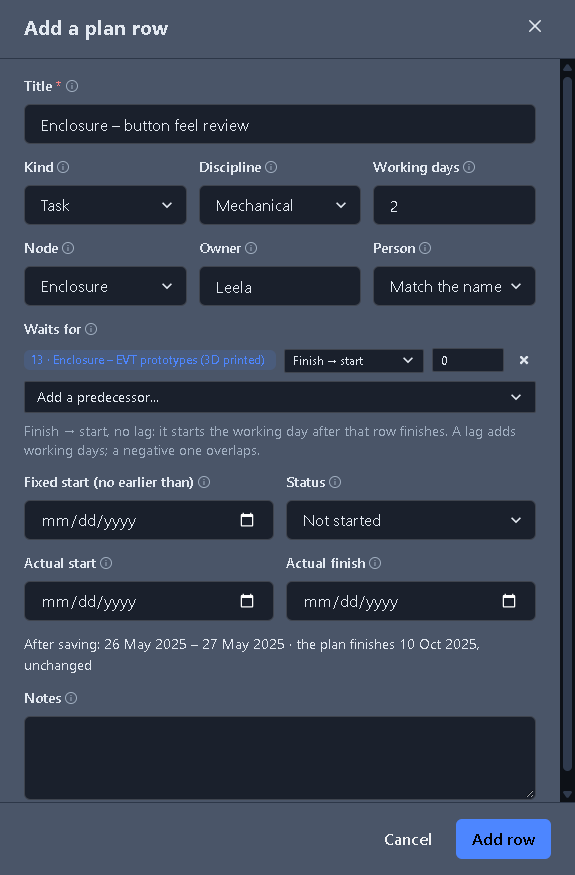
Suppose the team adds a check that has to wait for the EVT enclosure prototypes.
- Click Add row. The editor opens at the left, headed "Add a plan row".
- Fill in:
- Title: Enclosure – button feel review
- Discipline: Mechanical
- Working days: 2
- Node: Enclosure
- Owner: Leela
- Waits for: in Add a predecessor…, choose "13 · Enclosure – EVT prototypes (3D printed)". It is added as Finish → start, with a lag of 0.
- Check the line under the dates: "After saving: 26 May 2025 – 27 May 2025 · the plan finishes 10 Oct 2025, unchanged".
- Click Add row.
What you should see
- The row: directly below row 13, the row it waits for, with C-1 in the # column. Rows added in Creopus are numbered C-1, C-2 and so on, skipping any ID your workbook uses, and a number is never reused. Its editor is headed "Edit plan row C-1".
- Its dates: 26–27 May 2025, in red. Work added with past dates is late straight away. If it happened, record its actual dates; if it is still to come, give it a fixed start.
- Baseline and Var: "—". The row did not exist when the baseline was set.
- Float: 97 working days. Nothing waits on it, so it is not on the critical path, and the forecast does not move.
- Done: 2 / 35. Late: 39.
- Schedule health: "Rows missing a predecessor or a successor" becomes 4, led by "C-1 · Enclosure – button feel review", because nothing waits on it yet. "Float above 44 working days" flags 2 rows: C-1 and "P-4 · Pilot build purchase orders".

Exercise 10: Delete safely
Nothing gets deleted in this exercise.
- Open C-1's editor and click Delete row. The footer asks "Delete this row? This cannot be undone." Click Keep it, then Cancel.
- Open row 13's editor, click Delete row, then Delete. Row 13 is not deleted, because two rows wait on it. The footer asks instead: "C-1 · Enclosure – button feel review; 14 · Mobile app – pairing and live temperature wait on this row. Delete it and make them wait on its predecessors instead?"
- Click Keep it, not the red Delete and relink. Then click Cancel.
What you should see
- The plan: unchanged, with all 43 rows.
Delete and relink would make both rows wait on row 13's own predecessor, row 12, so the chain stays connected. A plain delete would leave them waiting on nothing, and they would jump back to the plan's start.

Exercise 11: Re-import the workbook
Teams keep editing their Excel plan. A re-import updates the plan without losing what was recorded here.
- Optional: open row 2's editor and replace its note, "Long-lead sensor: order samples in week 1", with your own, such as "Samples from two suppliers". Click Save.
- Click Import workbook, choose the same file, and click Import 42 rows.
What you should see
- The message: "Plan imported" and "0 rows added, 42 updated. Kept as they were: 1 row added in Creopus. Link rows to their evidence from Suggested evidence."
- What survives: the progress you recorded, the Rev B baseline and the holiday. The forecast still ends 10 Oct 2025, +1 working day, and Done still reads 2 / 35.
- C-1: still below row 13. Row 2: still has your note.
The rule:
- The workbook owns the planning: titles, durations, links, owners and fixed starts. Change a duration in Creopus and a re-import puts the workbook's back.
- Creopus owns what is recorded here: status, actual dates, node, discipline, the baseline, and any note written here.
- A row added in Creopus that the workbook comes to carry, under its C-ID in the workbook's ID column and with the same title, stays one row: the import adopts it rather than adding a twin. Case, spacing and the kind of dash do not matter. A row of the file with that ID under another title comes in as a row of its own, and the preview says so before you import.
Exercise 12: Export to Excel
- Click Export .xlsx. The file is named after your system and today's date, for example Smart-Thermostat-planner-practice-plan-2026-10-22.xlsx.
- Open it.
What you should see
- Sheets: All, then one sheet per discipline: Hardware, Firmware, Mechanical, Software, Test and Program. Each repeats the stage gates as grey separator rows.
- At the top: the plan's name, then a legend of Planned, Task Completed, Task WIP and Late.
- The columns: 22 standard columns, with the workbook's own heading on the seven it had (ID, Task, Days, Owner, Start, Finish and Notes): ID, Task, Days, Critical, Owner, SKU / Features, Risk, Priority, Major Challenges, Notes, Plan Vs Actual Days, Start, Finish, Status, Actual Start, Actual End, Predecessors, Resources, Budget, % Complete, Actual Cost and Type. Type says what each row is, Task, Milestone or Level of effort, as Primavera P6 marks activity types.
- After them: a weekly grid, coloured by each row's status. A level-of-effort row is never coloured Late.
- Dates: today's, with your edits and the holiday.
An export is not a plan to import again: Import workbook refuses it, because it would add every row a second time. It is for the weekly meeting. When the team has written progress into it, Update from Excel reads the progress back, as exercise 20 shows.
Run the plan with a team
Exercise 13: Move cards on the board
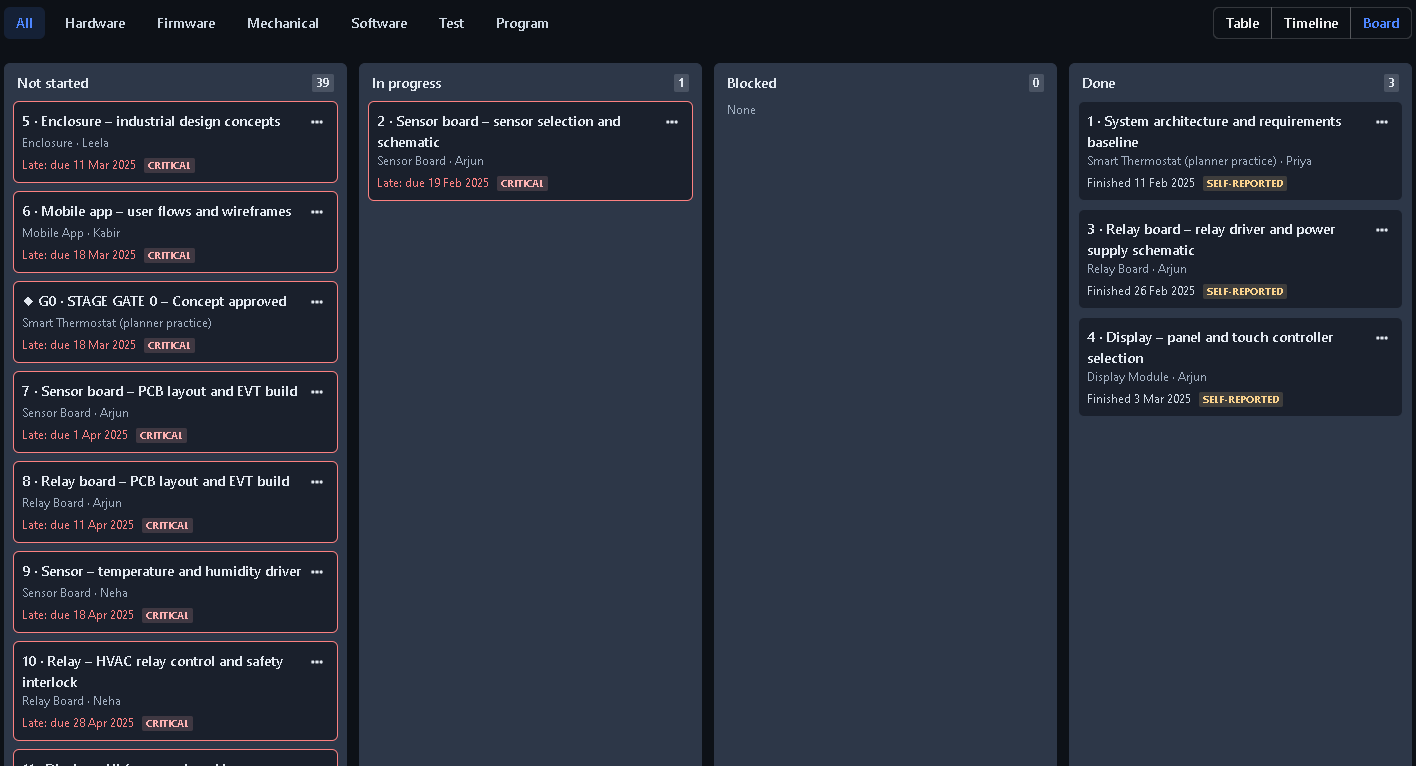
- Click Board, beside Table and Timeline.
- On the card for "4 · Display – panel and touch controller selection", open the … menu and choose Move to Done. You can also drag the card into the Done column.
What you should see
- Before the move: a column per status, Not started (40), In progress (1), Blocked (0) and Done (2). Each card shows its ID and title, its node and owner, and its due date ("Late: due 3 Mar 2025"), and marks rows that are critical or self-reported.
- The message: "Recorded as finished on 3 Mar 2025" and "Its planned finish. If it finished on another day, set the actual finish in the row’s editor." It is the same rule as the table: a past row records its planned dates.
- The columns: 39, 1, 0 and 3.
- Done: 3 / 35, "0 evidenced · 3 self-reported". Late: 38, with "34 open on the critical path". Forecast: unchanged.
The discipline tabs filter the board as they filter the table. A card whose status comes from evidence is locked, and its lock says why.
Exercise 14: Link rows in other ways
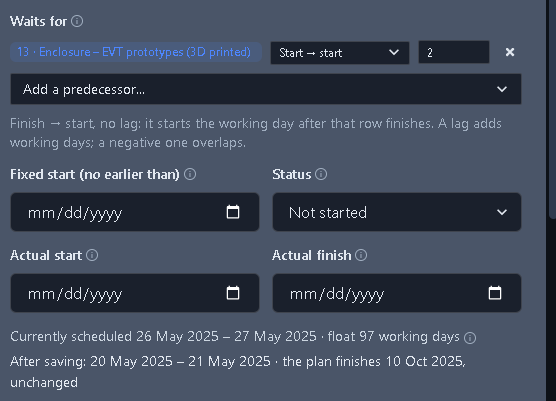
The button feel review can start once the prototypes have been in hand for two days. It does not need to wait for all of them.
- Go back to Table and open C-1's editor.
- Under Waits for, change Finish → start to Start → start, and set the lag box beside it to 2. The line under the dates reads "After saving: 20 May 2025 – 21 May 2025 · the plan finishes 10 Oct 2025, unchanged".
- Click Save.
What you should see
- C-1: now runs 20–21 May 2025. It starts two working days after row 13 starts on 16 May, instead of the working day after row 13 finishes.
- Schedule health: "Links with a lag" and "Links other than finish-to-start" each count 1 link, C-1's, at 2.7%: both inside their limits (5% and 10%). Lags and unusual links often stand in for work nobody has named, so DCMA asks that they stay rare.
The four link types are finish → start, start → start, finish → finish and start → finish. A negative lag is a lead: finish → start with −1 starts on that row's last day.
Exercise 15: Link owners to people
The owners in the workbook are names, not people. A row reaches someone's My plan items only once its owner is linked to them. For this exercise, you are Leela.
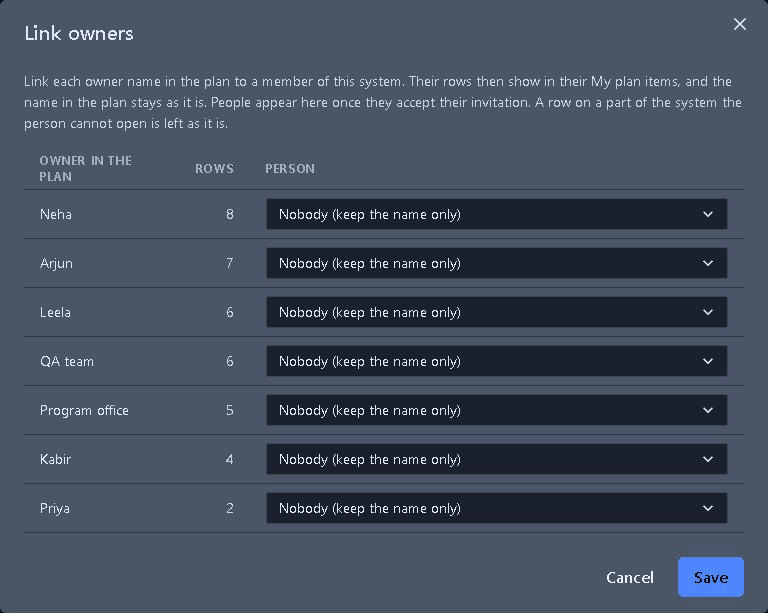
- Click Link owners. Each owner name is listed with its rows, and each is linked to Nobody (keep the name only).
- Beside Leela, pick yourself. The button now reads Save 1 name: click it.
- In the menu bar, open My Work → My Plan Items.
- Click Open the plan, then Back to the system. Select the Enclosure node and open its Plan tab.
What you should see
- Link owners: Neha 8 rows, Arjun 7, Leela 6, QA team 6, Program office 5, Kabir 4 and Priya 2.
- The message: "6 rows changed" and "Each person now sees their rows in My plan items." Leela's name stays in the plan as it is, now with a small person icon.
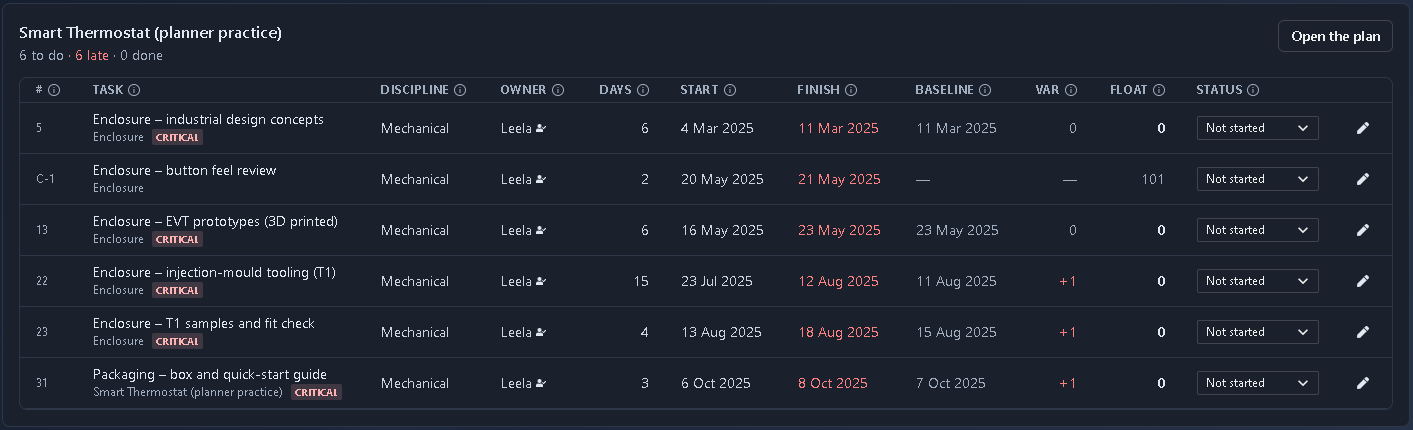
- My Plan Items: "Program-plan rows you own, across your systems". Under Smart Thermostat (planner practice): "6 to do · 6 late · 0 done", with Leela's six rows, 5, C-1, 13, 22, 23 and 31, and their dates as the plan has them. Rows you own in your other systems are listed too, each under its own system's name. Change a status here, or use the pencil to open the row in its plan.
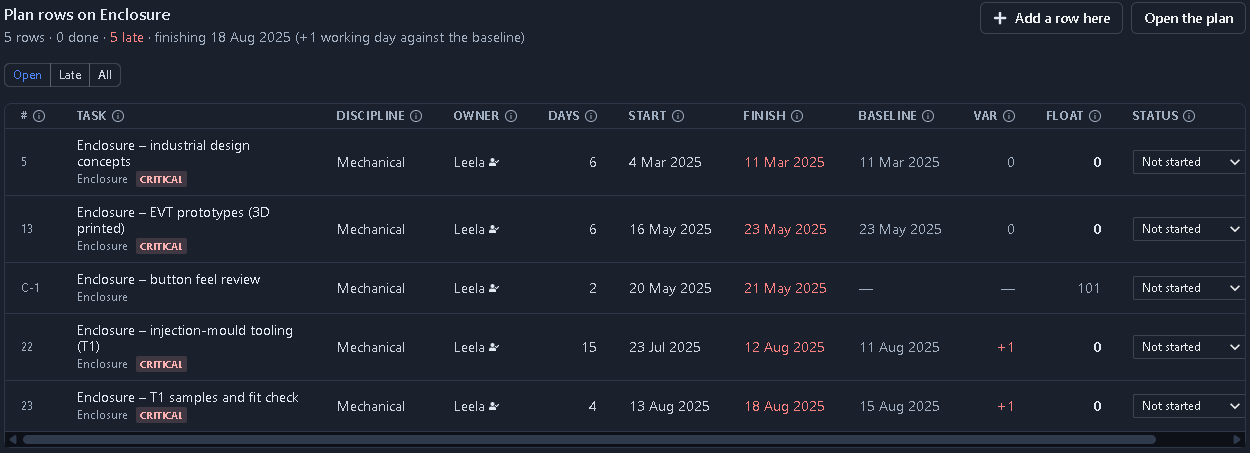
- The Enclosure's Plan tab: "Plan rows on Enclosure" and "5 rows · 0 done · 5 late · finishing 18 Aug 2025 (+1 working day against the baseline)": rows 5, 13, C-1, 22 and 23. Leela's sixth row, the packaging, sits on the system itself, not on the Enclosure. Add a row here opens a new row already placed on this node.
On your own plans, a name that matches exactly one member is linked automatically, and people appear in this list once they have accepted their invitation. To confirm, also in My Plan Items, is where a second editor vouches for a row someone else marked done without evidence. Nobody can confirm their own report, so it takes a teammate: try it when you invite one to your own system.
People and money
Exercise 16: Add resources
Resources are the people, teams and equipment the work needs. Rates turn their time into budgets.
- Click Calendar, set Currency to INR ("What every cost in the plan is in: resources' rates, fixed costs and actual costs."), and click Save.
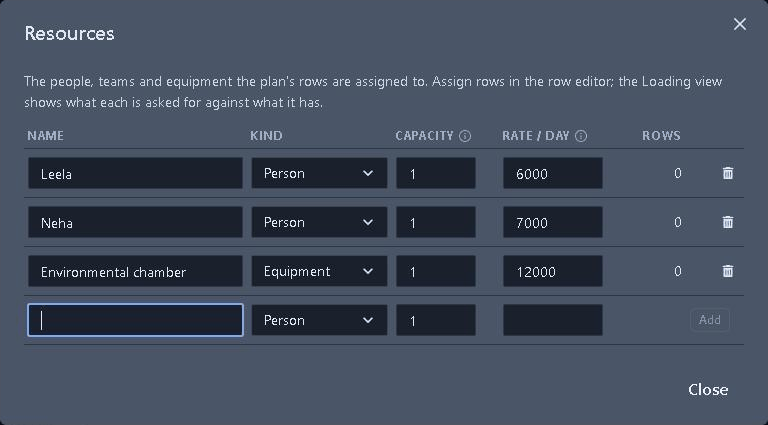
- Click Resources and add three, one at a time: fill in the empty row's name, kind, capacity and rate per day, and click Add.
| Name | Kind | Capacity | Rate / day |
|---|---|---|---|
| Leela | Person | 1 | 6000 |
| Neha | Person | 1 | 7000 |
| Environmental chamber | Equipment | 1 | 12000 |
- Click Close. Open row 13's editor, and under Resources choose Leela in Assign a resource. Leave the units at 1. Click Save.
- Assign the rest in the same way:
- C-1 · Enclosure – button feel review: Leela.
- 22 · Enclosure – injection-mould tooling (T1): Leela, and set Fixed cost (INR) to 350000 for the mould.
- 12 · Wi-Fi – provisioning and cloud connection: Neha.
- 24 · DVT – reliability and environmental tests: Environmental chamber.
What you should see
- A new view: Loading, beside Table, Timeline and Board.
- The row editor: now also shows Fixed cost (INR), % complete and Actual cost (INR), because the plan has a currency.
- Schedule health: two new checks, "Tasks with no resource" and "Tasks with no budget", each 27 (84.4%, limit 0%). This practice costs only five rows.
- Cost and earned value: a new panel, saying "This baseline holds no budgets, so there is nothing to measure earned value against." A budget counts only once it is in a baseline, which exercise 18 sets.
Capacity is in units: 1 is one person full time, 3 a team of three, 0.5 someone half time.

Exercise 17: Find and level an overload
- Click Loading.
- Scroll the grid to May, and click Leela's red week, the week of 19 May.
- Click Level resources. Nothing changes yet: a preview appears.
- Click Apply.
What you should see
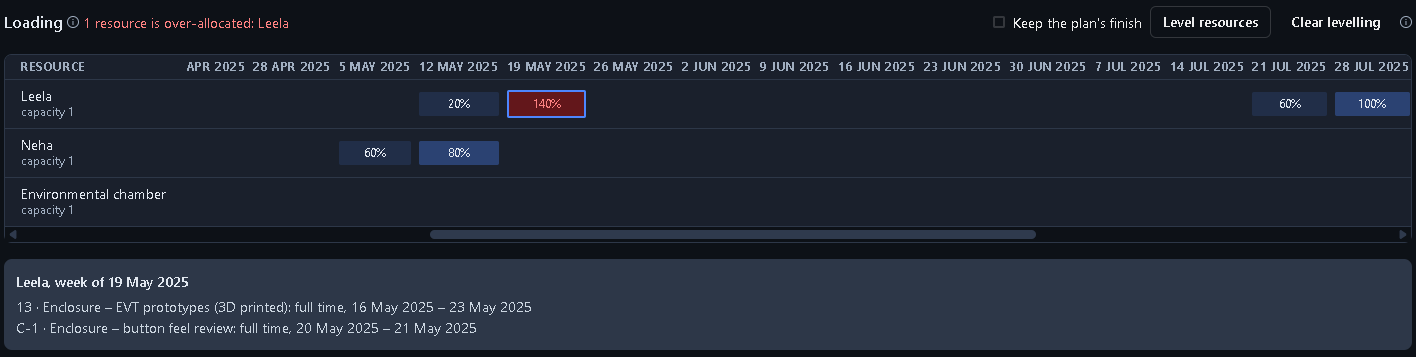
- The heading: "1 resource is over-allocated: Leela".
- The weeks: Leela at 20% in the week of 12 May and 140% in the week of 19 May, in red. Neha at 60% and 80% in the weeks of 5 and 12 May.
- Below the grid, after step 2: "Leela, week of 19 May 2025", with "13 · Enclosure – EVT prototypes (3D printed): full time, 16 May 2025 – 23 May 2025" and "C-1 · Enclosure – button feel review: full time, 20 May 2025 – 21 May 2025". The start → start link from exercise 14 put both on her at once.
- The preview, after step 3: "Levelling would move 1 row. The plan would finish 10 Oct 2025 (now 10 Oct 2025), with 0 over-allocated working days (now 2)." C-1 would move from 20–21 May to 26–27 May, held back 4 working days.
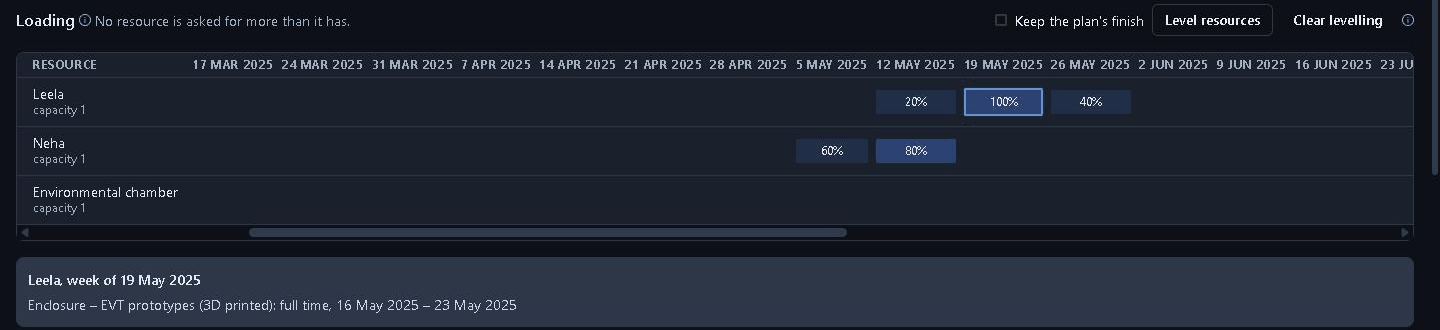
- After Apply: the heading reads "No resource is asked for more than it has.", and Leela's weeks read 20%, 100% and 40%.
How levelling chooses: the rows with the most float wait first, so the critical path keeps its dates where it can. Started and finished work stays where it is, and a row moves whole. Tick Keep the plan's finish to level only within float. Clear levelling takes every levelling delay away, with the same preview first.

Exercise 18: Cost and earned value
A budget counts only once it is in a baseline.
- Click Set baseline, type Rev C with budgets, and click Set baseline in the box.
- Record what has been spent:
- Row 12: set Status to Done and Actual cost to 52000, and click Save. With no dates typed, it records its planned dates, 7–15 May.
- Row 13: set % complete to 50 and Actual cost to 20000, and click Save. It moves to In progress on its own, from 16 May.
What you should see
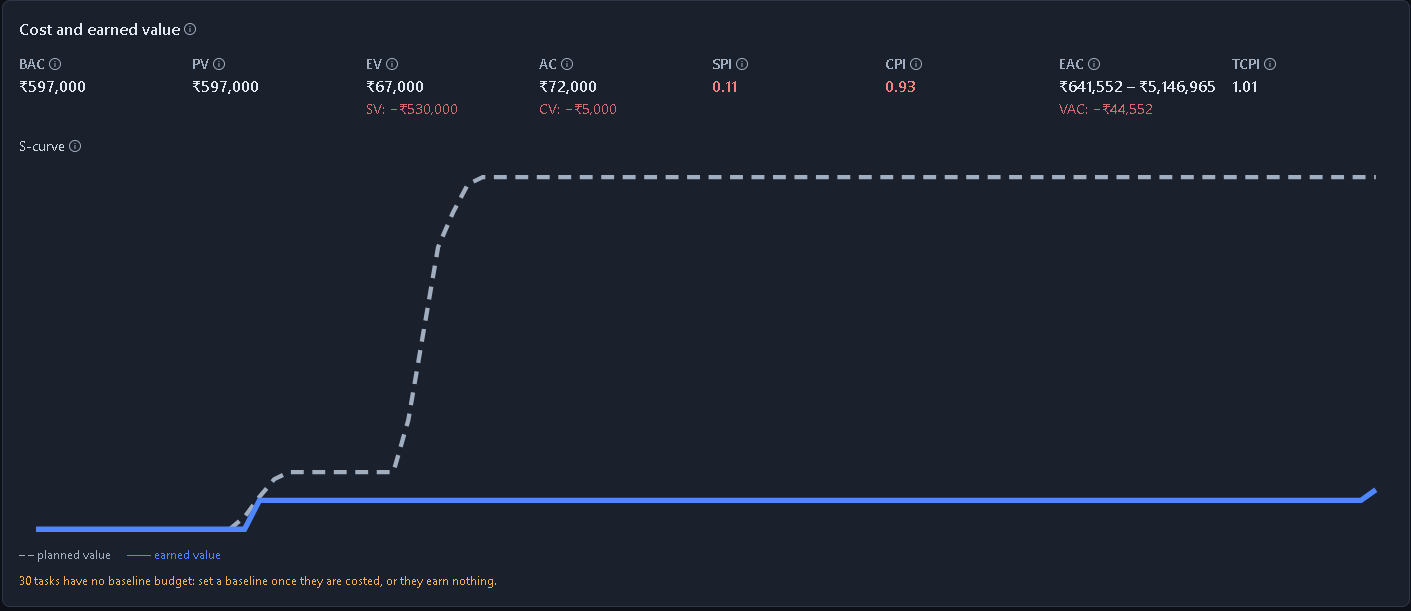
- After step 1, under Cost and earned value: BAC, the baseline budget, ₹597,000; PV also ₹597,000, because every baseline date is in the past, so all the work was planned to be done by today; EV ₹0 and SPI 0.00. The panel adds "30 tasks have no baseline budget: set a baseline once they are costed, or they earn nothing."
| Row | Budget |
|---|---|
| 12 · Wi-Fi – provisioning (Neha, 7 days × ₹7,000) | ₹49,000 |
| 13 · Enclosure – EVT prototypes (Leela, 6 × ₹6,000) | ₹36,000 |
| C-1 · Enclosure – button feel review (Leela, 2 × ₹6,000) | ₹12,000 |
| 22 · Enclosure – tooling (Leela, 15 × ₹6,000, plus ₹350,000) | ₹440,000 |
| 24 · DVT – environmental tests (chamber, 5 × ₹12,000) | ₹60,000 |
- After step 2: Done 4 / 35, Late 37, with "33 open on the critical path".
- The panel:
| Figure | Value | Why |
|---|---|---|
| BAC | ₹597,000 | the baseline budget |
| PV | ₹597,000 | all of it was due by today |
| EV | ₹67,000 | row 12 earns all of its ₹49,000; row 13 earns half of its ₹36,000 |
| AC | ₹72,000 | ₹52,000 + ₹20,000 |
| SV, CV | "SV: −₹530,000", "CV: −₹5,000", both in red | EV − PV, and EV − AC |
| SPI | 0.11 | EV ÷ PV: far behind schedule |
| CPI | 0.93 | EV ÷ AC: each rupee spent has earned 93 paise of work |
| EAC | ₹641,552 – ₹5,146,965 | AC + (BAC − EV) ÷ CPI at best, and divided by CPI × SPI at worst |
| VAC | "VAC: −₹44,552", in red | BAC − the best-case EAC |
| TCPI | 1.01 | (BAC − EV) ÷ (BAC − AC): the efficiency the rest needs to finish on budget |
- How amounts are written: in your browser's number format. English (United States) shows ₹597,000, as here; English (India) shows ₹5,97,000.
The S-curve draws planned value along the baseline (dashed) against earned value (solid). These are the standard EIA-748 indicators, worked out from the plan; the planner is not a certified earned value management system.
Exercise 19: Compare with an earlier baseline
The plan has kept three baselines: the import, Rev B and Rev C.
- Under Baseline, open Compare with the latest. It lists the earlier ones, newest first: Rev B after architecture slip, then Imported from smart-thermostat-practice-plan.xlsx. Choose the import's.
- Read the page, then click Back to the latest.
What you should see
- Forecast: "+4 working days against the baseline": the workbook's +1, row 1's +2 and the holiday's +1, all measured against the dates the team first imported.
- A banner: "Comparing with “Imported from smart-thermostat-practice-plan.xlsx” of 22 Oct 2026: the variance and the timeline’s baseline bars are measured against it. Rows added since have no baseline here.", with the date you imported.
- Cost and earned value: "This baseline holds no budgets, so there is nothing to measure earned value against." and "Actual cost so far: ₹72,000." The import's baseline was set before anything was costed.
- After Back to the latest: "0 working days against the baseline", against Rev C with budgets.

Files
Exercise 20: Update progress from Excel
Some teams will keep reporting in Excel. They can, without anyone retyping it.
- Click Export .xlsx for a fresh copy.
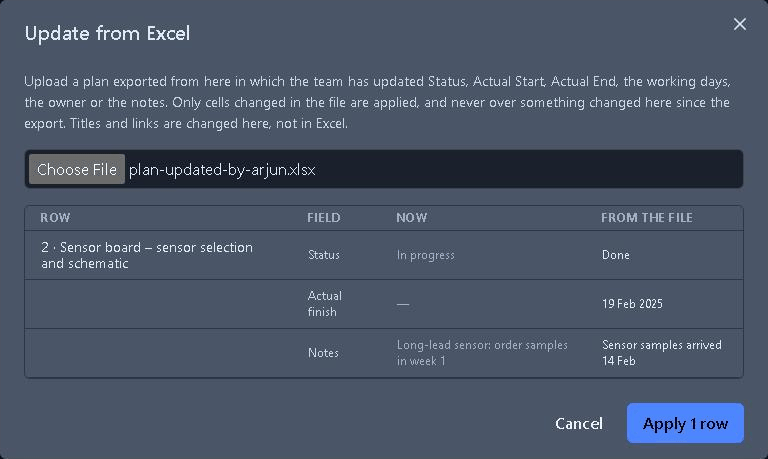
- Open it, and on the All sheet, find row 2, "Sensor board – sensor selection and schematic". Set Status to Done, Actual End to 19 Feb 2025, and Notes to "Sensor samples arrived 14 Feb". Save the file.
- Back in Creopus, click Update from Excel and choose the file.
- Click Apply 1 row.
What you should see
- The preview: only what changed in the file, under Row, Field, Now and From the file. For "2 · Sensor board – sensor selection and schematic": Status, In progress → Done; Actual finish, — → 19 Feb 2025; and Notes.
- The message: "Updated 1 row from", followed by your file's name.
- Done: 5 / 35. Late: 36.
The rules:
- Only cells changed in the file are applied, and never over something changed in Creopus since the export, so an old copy cannot undo newer work. Uploading the same file twice changes nothing.
- It reads status, actual start and end, working days, owner and notes. Titles, links, % complete and actual cost are changed in Creopus, and the Type column is for reading.
- Anyone on the system can upload, but only the rows they may edit change.
Exercise 21: Microsoft Project, and a plan drafted by AI
Export. Click Export for MS Project. The .xml file opens in Microsoft Project, ProjectLibre and Primavera, with every row as a task: links of all four types with their lags, actual dates, the baseline, the resources with their rates and assignments, each row's costs, the currency, and the working week and holidays.
That file is for opening the plan in Project, not for bringing it back. Import workbook refuses it: "This file was exported from Creopus. Importing it would add every row again; it is for opening the plan in Microsoft Project. To import a plan from Microsoft Project, choose a file saved in Project itself." To practise an import from Project, use smart-thermostat-practice-plan.xml, the Project file under You need, in a second practice system so this one stays as it is.
- Fork the practice template again, as in exercise 1. The second copy has the same name; the system selector tells the two apart by when each was made. Carry on from the page you land on.
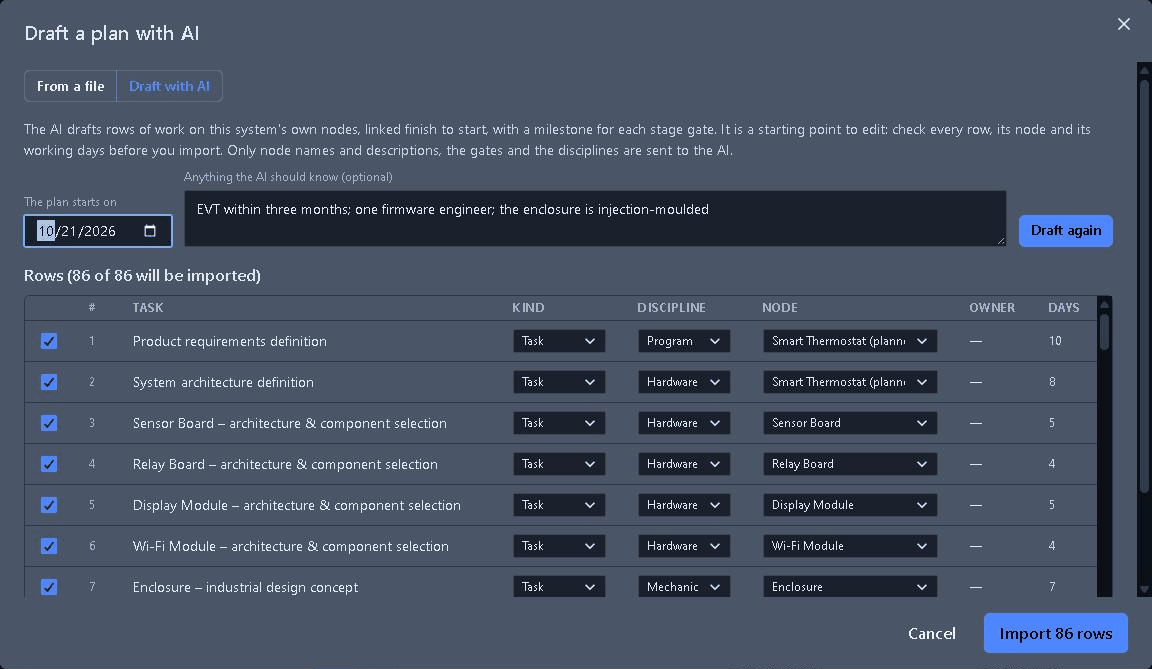
- Click Program plan, then Draft a plan with AI. Type something the AI should know, for example "EVT within three months; one firmware engineer; the enclosure is injection-moulded", and click Draft the plan. Look through the draft, then click From a file instead of importing it.
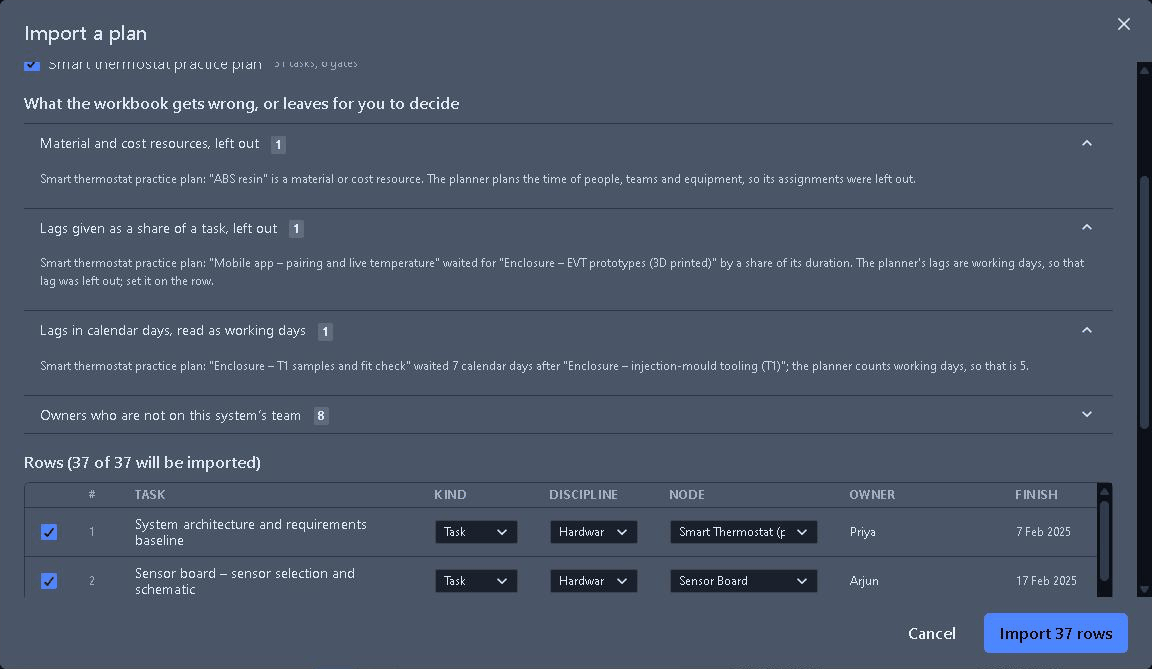
- Click Choose File and pick smart-thermostat-practice-plan.xml: the file you downloaded for this tutorial, not the one Creopus exported a moment ago.
- Read the preview, then click Import 37 rows.
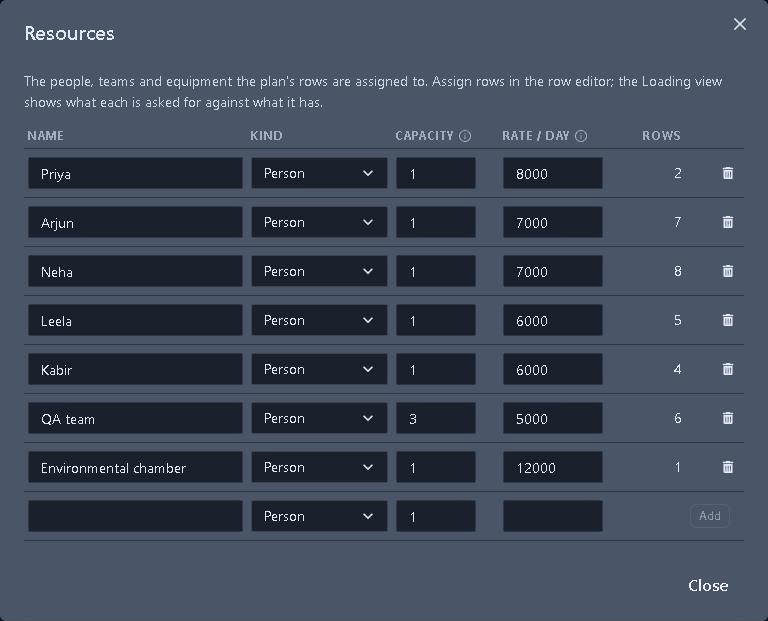
- Click Resources.
What you should see
- The draft: rows on this system's own nodes, linked finish to start, with a milestone for each stage gate. "Only node names and descriptions, the gates and the disciplines are sent to the AI." Each draft differs; ours had 95 rows.
- The preview: one sheet, "Smart thermostat practice plan", with "31 tasks, 6 gates", and four groups in the report:
- Material and cost resources, left out (1): "ABS resin" is a material, and the planner plans the time of people, teams and equipment.
- Lags given as a share of a task, left out (1): the pairing work waited for the EVT prototypes by a share of their duration. The link stays; the lag goes, so set one on the row if you need it.
- Lags in calendar days, read as working days (1): the T1 samples waited 7 calendar days after the tooling. The planner counts working days, so that is 5.
- Owners who are not on this system's team (8): a Project file names each task's owners through the resources assigned to it.
- After the import: "Plan imported" and "37 rows added, 0 updated." Forecast: 3 Feb 2025 – 14 Oct 2025. Done: 0 / 31.
- The currency: INR, read from the file: a plan with no currency takes its first Project file's.
- Resources: the file's people and teams, with their rates in rupees (₹8,000 a day for Priya, ₹5,000 for the QA team, whose capacity is 3), and their rows already assigned. A Project file carries no kind, so each is a Person; change the chamber to Equipment if you like.
The file's phases (Concept, EVT, DVT, PVT and Launch) are summary tasks; each becomes the group of the rows under it. Progress recorded in a Project file is not imported: record it on the rows after. When you are done, go back to your first practice system for the rest: in the system selector, the copy made first. The second can stay, or be deleted from the System Hierarchy.
Exercise 22: Remove an imported sheet
If an import brought in rows it should not have, such as a tab that repeats another, Remove imported sheet takes them out in one step. Nothing gets removed in this exercise.
- In your first practice system, click Remove imported sheet. Choose Program (5 rows) from the list, which also holds Master Plan (37 rows).
- Click Cancel, not Remove 5 rows.
What you should see
- The dialog, after step 1: "5 rows will be removed.", with the button Remove 5 rows.
- The plan, after Cancel: unchanged, with all 43 rows.
Rows that carry evidence, or a self-report someone confirmed, are kept, and so is a row added in Creopus that a re-import matched by its C-ID and title: it goes back to being a Creopus row. Rows that waited on a removed row wait on its predecessors instead.

Evidence and agents
Exercise 23: Let evidence close a row
So far every Done is someone's word: the figure reads "0 evidenced". A row can instead name the engineering evidence that proves it is finished: an approved document, a passed test, a passed gate review, a frozen configuration. When the evidence holds, the row is done on the evidence's own date.
The evidence here will be dated today, so this exercise moves the forecast into the present. That is why it comes near the end.
-
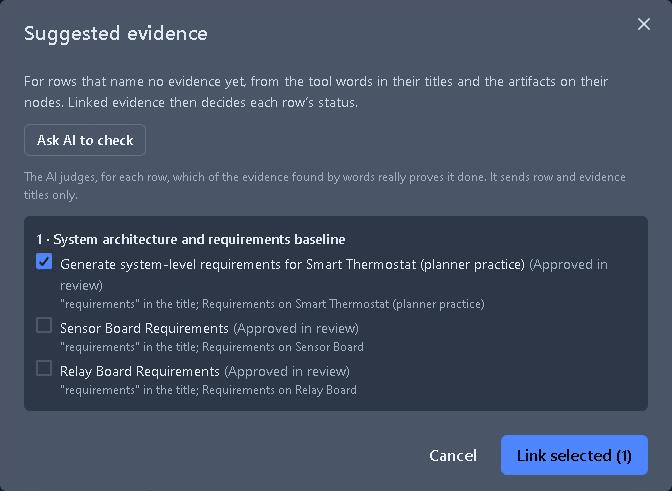
Click Suggested evidence. Read the suggestions, then click Cancel.
-
Click Add row and fill in:
- Title: Wi-Fi module – freeze the EVT configuration
- Discipline: Firmware
- Working days: 1
- Node: Wi-Fi Module
- Owner: Neha
- Waits for: 12 · Wi-Fi – provisioning and cloud connection
Click Add row.
-
Open its editor, "Edit plan row C-2", and click Link evidence. Set Kind of evidence to Configuration baseline, pick Configuration baseline · Wi-Fi Module ("Wi-Fi Module · Not started: No configuration baseline yet"), leave Done when at Baseline frozen, and click Link. Close the editor.
-
Click Back to the system, select Wi-Fi Module, and open its Baselines tab, at the right end of the node's tabs. Click Freeze, type the label EVT configuration, leave Scope at "This node + descendants", and click Freeze now.
-
Open the Program plan again, and open C-2's editor.
What you should see
- Suggested evidence: three documents for row 1, "System architecture and requirements baseline", each because "requirements" is in both titles: the system's requirements document, "Generate system-level requirements for Smart Thermostat (planner practice)", and the Sensor Board's and Relay Board's requirements. Ask AI to check sends only row and evidence titles, and keeps what really proves each row. Every requirements document in the practice system is still a draft, and a draft can never close a row: that is why you cancel.
- The new row: C-2, planned for 16 May 2025, with 104 days of float.
- After Link: the evidence card reads "Configuration baseline · done when: Baseline frozen", with the badge NOT STARTED, and a note says "Evidence decides this row’s status and finish. What you type above is kept as your own report."
- On the Baselines tab: "EVT configuration", with today's date and time.
- In the plan:
- C-2: DONE, marked evidenced, reading 16 May 2025 – today: it started on its planned day and finished on the day of the freeze.
- Its evidence card: HOLDS, with "Frozen 22 Oct 2026: EVT configuration" and "Completed this row on 22 Oct 2026: Configuration baseline "EVT configuration" frozen", each with your own date.
- Done: 6 / 36: "1 evidenced · 5 self-reported".
- Forecast: ends today, many working days against the baseline (269 when we did it, on 22 Oct 2026), and every other row gains that much float. A practice row has finished more than a year after its plan, and the plan says so.
- Schedule health: C-2 now ends the plan, so neither it nor "STAGE GATE 4 – Launch ready" is flagged as missing a successor.
The rules: a draft is progress, never done. Evidence dated before the row starts does not count, and while the work a row waits for is unfinished, holding evidence waits too, with a Count it button for work that really was done early. Done stays done: if the evidence changes later, the row keeps its finish and carries a warning.
To put the plan back, open C-2's editor and unlink the evidence with the icon on its card: the row reopens and the forecast returns to 10 Oct 2025.




Exercise 24: Drive the plan from an agent
- On the plan page, click the robot at the right edge. The agent opens there, headed "Agent — Program plan", and under its title it says what it works on: "The program plan of Smart Thermostat (planner practice)."
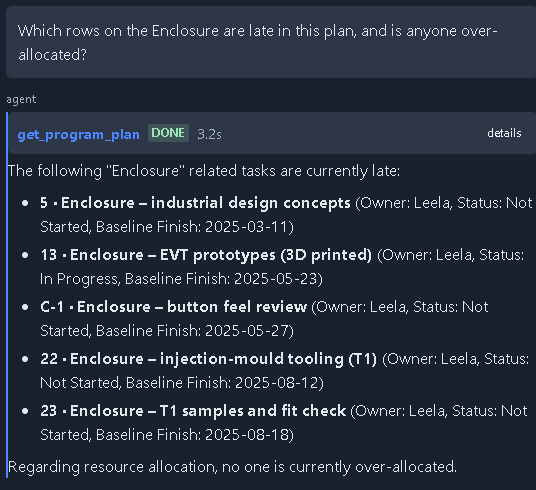
- Ask: "Which rows on the Enclosure are late in this plan, and is anyone over-allocated?"
- Ask: "Export the plan for Microsoft Project."
- Ask: "Leela finished 'Enclosure – industrial design concepts' on 13 March 2025. Record it." The agent stops before any change, with "Agent wants to run a tool". Click Reject…, type why (we wrote "Practice only: leave the plan as it is"), and click Reject with reason.
- At the top of the agent, Copy conversation puts the whole conversation on the clipboard as Markdown, and Download conversation saves it as a .md file.
What you should see
- Step 2: the agent reads the plan and names the five late Enclosure rows by their ID and title, as the plan shows them: 5, 13, C-1, 22 and 23, from "5 · Enclosure – industrial design concepts" to "23 · Enclosure – T1 samples and fit check". It finds nobody over-allocated, since you levelled in exercise 17. The agent words its answer its own way each time, and may add the owner, Leela: the rows are what to check.
- Step 3: a card under the tool call, export_program_plan, with the file and how long its link works: "Smart-Thermostat-planner-practice-plan-2026-10-22.xml" and "Works until 17:20 Asia/Calcutta" when we did it. The time is 15 minutes on, in your plan's time zone, and the agent's reply says the same. The link works only for you; the card's link is the tool's own, so use it.
- Step 4: the dialog names the tool, update_plan_item, the row it would change, as "item": "5 · Enclosure – industrial design concepts", and what it would set: status done and actual finish 2025-03-13 (Show raw input shows the whole request). Approve would make the change. After Reject with reason, the card reads "You declined this action — it did not run.", with your reason, and the row is unchanged.
- The conversation: kept. Close the agent with », or leave the page, and it is there again when you come back to this plan. Another system's plan has a conversation of its own. It is also on the Agent page, with your other sessions.
The agent can do almost everything the plan page does, from adding rows and linking evidence to levelling resources and importing a file attached to a node. Confirming someone else's self-report stays on the plan page, because it is a second person's sign-off.


MCP clients. Claude, Cursor and other MCP clients reach the same planner through the Creopus MCP server: read the plan and its earned value, edit rows, level resources, and export or import plan files. Connect it locally on any plan, or remotely on Professional, Team and Enterprise, then ask in your client, for example "Read the program plan of my Smart Thermostat (planner practice) system and list the late rows with their owners."
Next: your own plan
Open your own system, click Program plan and import your workbook or Project file, or draft one with AI. Read the report before you import: it tells you what in your file needs checking. Then record what is done, set a baseline when the team agrees the dates, add your holidays, link owners to your team, and link rows to the evidence that will prove them done.